In this post, I’ll take you through how to create an Entra ID App Registration using the Microsoft Graph Sites.Selected permission and how to scope that App Registration to specific SharePoint sites with either read‑only or write access. Once configured, the App Registration will be able to make Microsoft Graph API calls only against the sites you’ve explicitly granted access to.
I’ll also include a few simple Graph API examples at the end to help you get started using the App Registration to interact with those scoped SharePoint sites.
Table of Contents
- Prerequisites
- Creating the Entra ID App Registration
- Scoping the App Registration to selected sites
- Example SharePoint API Calls
- Creating a Client Secret
- Get the SharePoint Site Long ID
- Properties you will need for API calls
- Example – GraphAPI Auth and Get an access_token
- Example – List root folder contents (providing the access token as an Header Auth Bearer)
- Example – List all files in a folder (providing the access token as an Header Auth Bearer)
- Example – Get download URL for specific item ID (providing the access token as an Header Auth Bearer)
- Example – Get file content for specific item ID (providing the access token as an Header Auth Bearer)
Prerequisites
Before we start, if you haven’t already done so create your SharePoint sites(s)
Creating the Entra ID App Registration
In this section we will create a new App Registration and give it the Graph permissions Sites.Selected. As the permission name suggests this will allow activities such as API calls authenticated by the application to have access to “selected” SharePoint sites. In the following sections we will define which site(s) are selected
- Navigate to Entra ID admin portal
- Click into Manage => App registrations
- Click New registration, set the name and click Register
- On the Overview page, take a note of the “Application (client) ID”. We will need this later
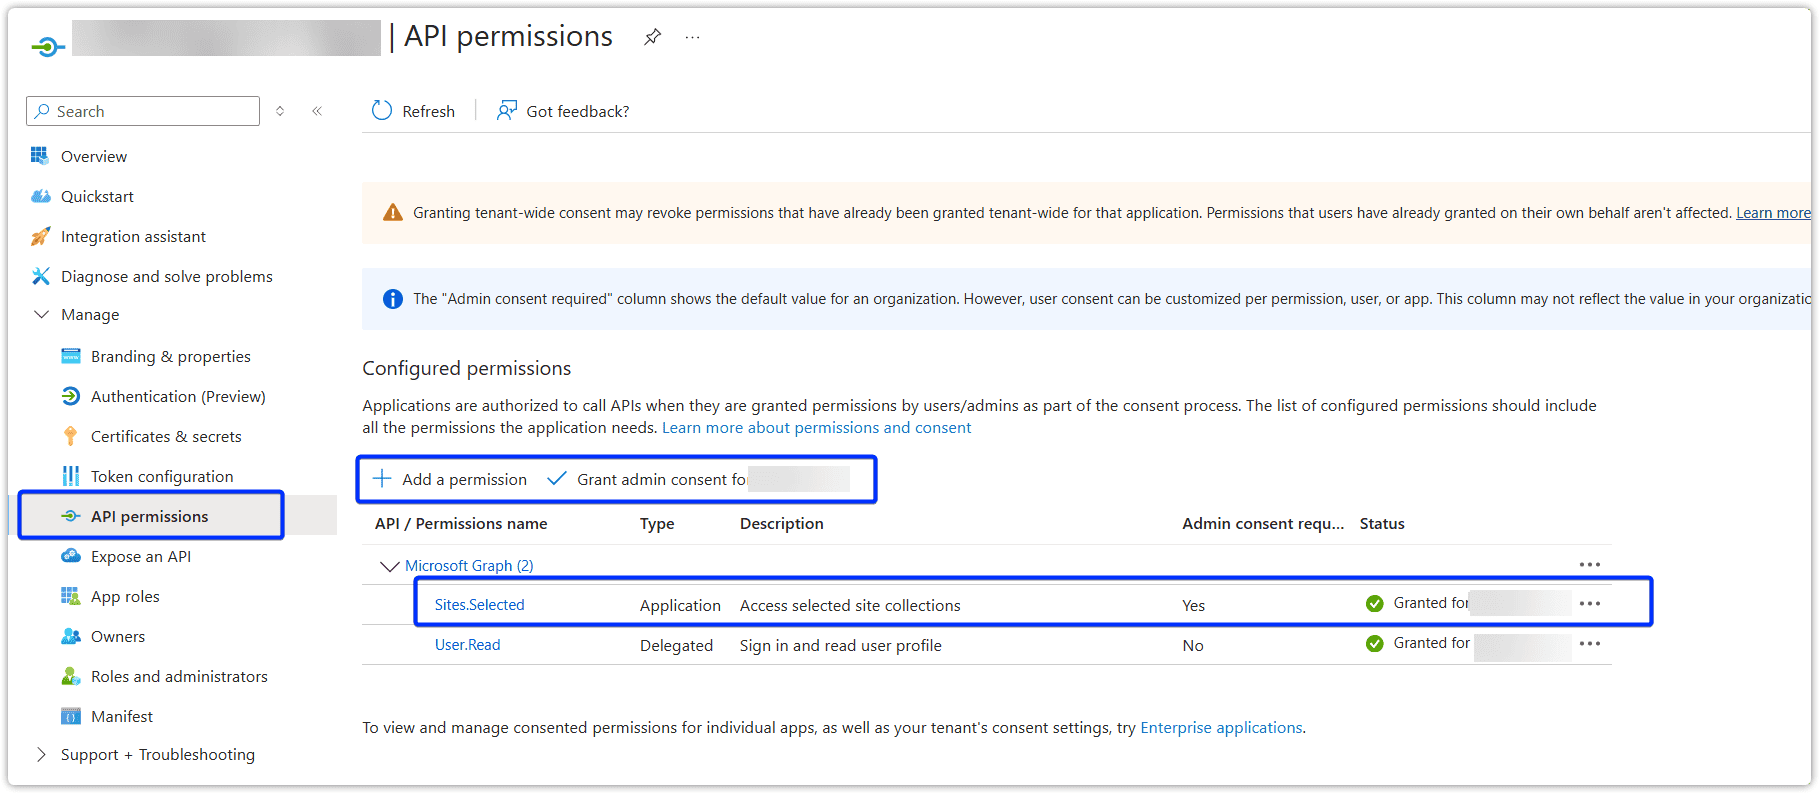
- Open the new registration and expand API permissions
- Click Add permission choose Microsoft Graph => Application permissions add Sites.Selected and click Add permission.
- Grant admin consent for the newly added permission
Scoping the App Registration to selected sites
Now we will define what SharePoint site(s) our new app registration has permission to along with what level level (read/write).
Repeat these steps for each required SharePoint site.
Getting the SharePoint Site Identifier
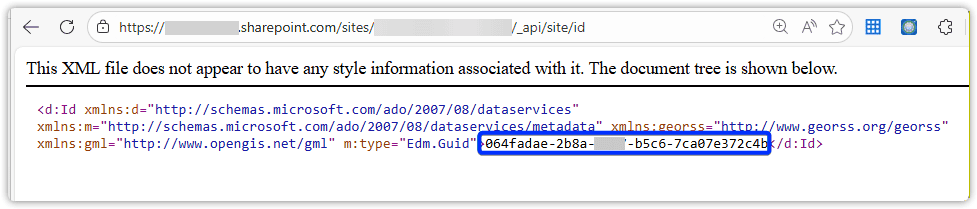
- Open your SharePoint site in a Web Brower
- At the end of the URL remove anything after the final slash and append “_api/site/id” i.e. https://<tennantname>sharepoint.com/sites/<SharePointSiteName/_api/site/id
- Copy the ID value
Granting the App registration Permission
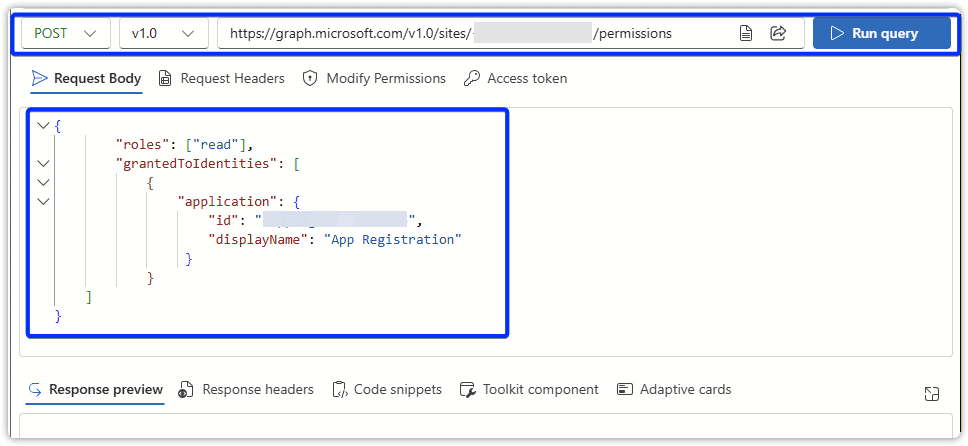
We are going to use the Graph API to grant our app registration the required permissions. For ease, we will be using the Graph Explorer interface.
- Logon https://developer.microsoft.com/en-us/graph/graph-explorer
- Post the following JSON body to: https://graph.microsoft.com/v1.0/sites/<SharePointSietID>/permissions
- Replace the role “read” with “write” if required
- Update displayName to something meanthinful
- Set the value for the application id as your App Registrations “Application (client) ID”, found on the overview page of the App Registration
{
        "roles": ["read"],
        "grantedToIdentities": [
            {
                "application": {
                    "id": "<AppRegistrationID>",
                    "displayName": "App Registration"
                 }
            }
    ]
}
- You can perform a GET request to the same endpoint URL to view the permissions currently assigned to the SharePoint site.
Example SharePoint API Calls
Creating a Client Secret
In this example we will use a simple Client Secret to authenticate to our App Registration.
- Open your previously created App Registration
- Expand Manage => Certificates & secrets => Client secrets
- Click New client secret
- Give it a description
- Set the expiry as required.
- Take a copy of the Value
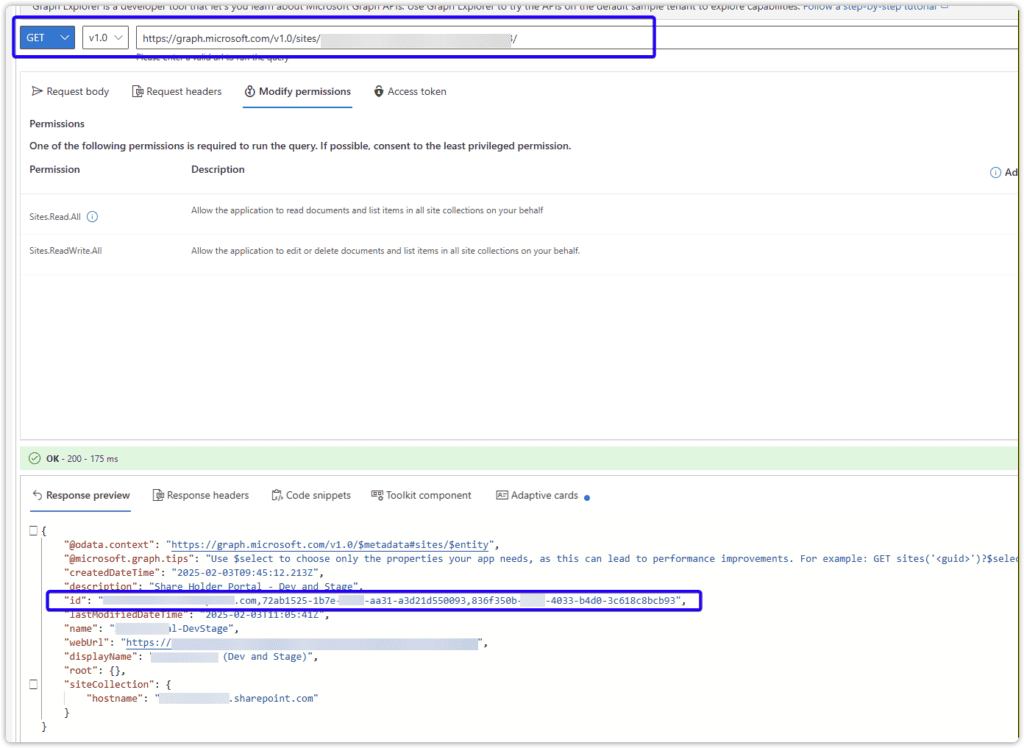
Get the SharePoint Site Long ID
Note: this is different to the short id we previous retrieved from “_api/site/id“
- Using Graph Explorer
- Perform a Get request to https://graph.microsoft.com/v1.0/sites/<SharePointSietID>
- Table a copy of the long id
Properties you will need for API calls
- SharePointSiteID: The long SharePoint ID from the previous section.
- ClientId: The App Registration “Application (client) ID”
- ClientSecret: The Client Secret Value previously created
- TennantID: Your EntraID Tenant ID, see the overview page of your App Registration
Example – GraphAPI Auth and Get an access_token
curl -d "grant_type=client_credentials&client_id={{ClientId}}&client_secret={{ClientSecret}}&scope=https://graph.microsoft.com/.default" -X POST https://login.microsoftonline.com/{{TennantID}}/oauth2/v2.0/token
Example – List root folder contents (providing the access token as an Header Auth Bearer)
GET https://graph.microsoft.com/v1.0/sites/{{SharePointSiteID}}/drive/items/root/children
Will get you the Folder Item ID’s
Example – List all files in a folder (providing the access token as an Header Auth Bearer)
GET https://graph.microsoft.com/v1.0/sites/{{SharePointSiteID}}/drive/items/{{FolderItemID}}/children
Will get you the Folder Item ID’s for sub folders and Item IDs for any files
Example – Get download URL for specific item ID (providing the access token as an Header Auth Bearer)
GET https://graph.microsoft.com/v1.0/sites/{{SharePointSiteID}}/drive/items/{{ItemID}}?select=id,@microsoft.graph.downloadUrl
Example – Get file content for specific item ID (providing the access token as an Header Auth Bearer)
GET https://graph.microsoft.com/v1.0/sites/{{SharePointSiteID}}/drive/items/{{ItemID}}/children