
I recently stated to deploy the Azure Point-to-Site VPN client to my users, but before I did I wanted to change a couple of things to improve my users experience.
I wanted to;
- Changing the icon.
- Changing the banner image.
- Add a couple of other routes so once connected via the VPN my users could jump back onto my on premise network and to some services in another Azure region.
- Change the Application title and the prompts, the default is to display your VNet name. Mine are descriptive to IT but are not very user pretty.
- Set an idle timeout, the default install will not timeout on idle.
- The big one. I wanted users and not just administrators to be able to use the client.
Getting Started
I will assume you already have Azure setup and you have a Virtual Gateway with Point-to-site configured.
- Navigate to your Virtual Gateway and select Point-to-site configuration
- Select “Download VPN client” at the top

- Once the download completes extract the zip file.
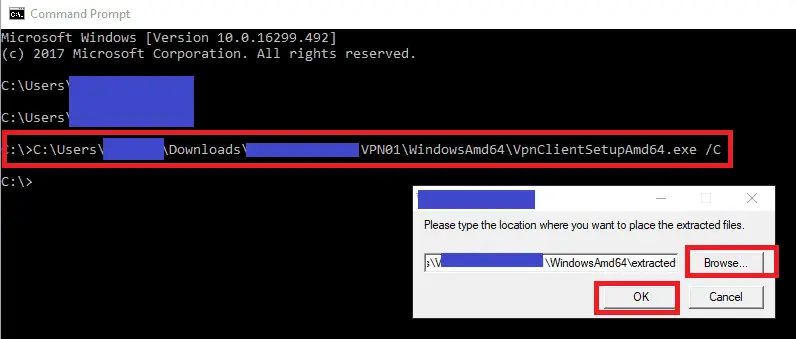
- Open a command prompt and drag in the “WindowsAmd64\VpnClientSetupAmd64.exe” installer and add the argument /C
- When prompted select a folder to extract the installer into and press OK
Changing the icon
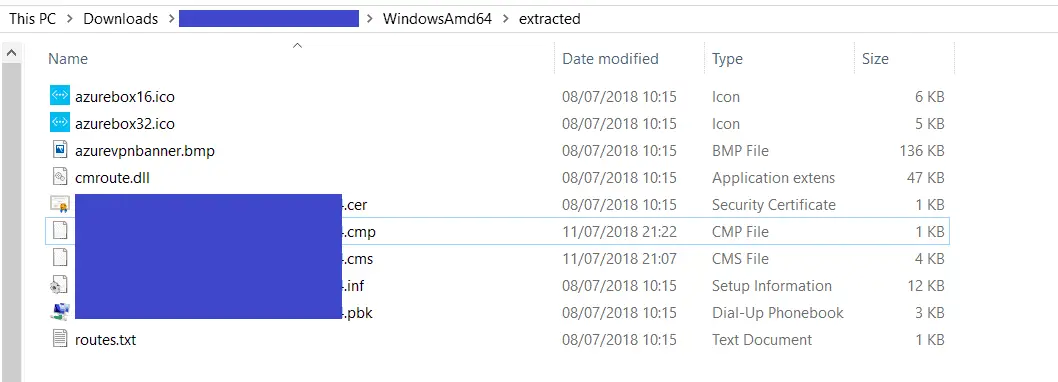
- Navigate into the folder you extracted the installer into.
- You should see there are type icons azurebox16.ico (16×16 pixels) and azurebox32.ico (32×32 pixels)
- You simply need to use an editor of your choice (such s GIMP) to replace these files, make sure you don’t change the names.
- There are plenty of online tools such as http://icoconvert.com/ to convert an image into an ICO if you don’t have a program.
Changing the banner image
- Again another simple one, just replace the “azurevpnbanner.bmp” with an image one of your choice.
Add additional routes
This section is only appropriate if your users have local admin rights. If not then skip this section and see below. This is because the built in method requires local admin rights to add these routes.
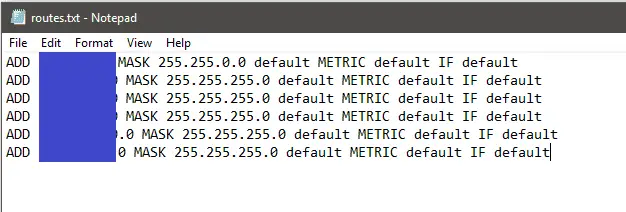
Behind my Azure Virtual Gateway I have site-to-sites VPN and some vnet-to-vnet links. I wanted my users to be able to connect to resources on these network however Microsoft say you need to add routes manually to the clients, however I found all you need to do is add them in the “routes.txt” file.
Note: for this to work you Virtual Gateway’s and remote Site-to-site endpoints generally need to have BGP configured and working.
More info can be found here on Microsoft article “About Point-to-Site VPN routing”
- Edit the “route.txt” file
- Copy and existing route and amend it as required
- Save and close.
Changing the application title and install prompt text
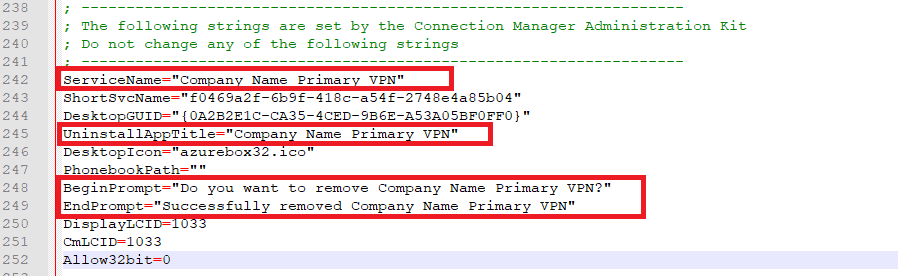
As mentioned above the default is to display your VNet name. I wanted something prettier such as “Company Name Primary VPN”
- Open the .inf file
- The settings we want to change start at around line 242
- Change ServiceName, UninstallAppTitle, BeginPrompt and EndPrompt values as required.
- Save and close the .inf file
- Open the .cms file
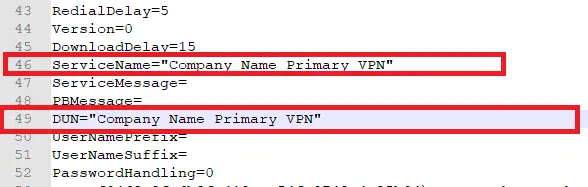
- The settings we want to change are around line 46 and 49
- Change the ServiceName and DUN values as required, they will need to be exactly the same as you set in the inf file. Enclose the name in ” ” if it contains spaces
- Save and close the .cms file
Setting an idle timeout
The default install would not timeout if left idle.

To change this behaviour you need to change the IdleTimeout setting in the .cmp file. The value needs to be in minutes.
Allow non administrators to use the Azure Point-to-site client
The downloaded client uses the “cmroute” dll to add the routes defined in the “routes.txt” file. The problem with this approach is it does this under the context of the current user, and a standard user can’t make changes to routes. My users as in most companies are just standard users making the client useless.
My solution is not to use cmroute, but instead get the client to trigger a scheduled task which runs as the system account. The schedule task then runs some powershell to add the routes, and as it runs as the system account it has the required permission.
The PowerShell
Deploy the below to the users computer, call it what you like I used something like “azure_route_manager.ps1”
# We need to pass the script the connection name
Param([string]$GLOBAL:alias='Company Name Primary VPN')
$GLOBAL:IpAddresse = Get-NetIPAddress -InterfaceAlias $GLOBAL:alias | Select-Object IPAddress

#-----------------------------------------------------------------------------------
#FUNCTIONS
#-----------------------------------------------------------------------------------
function RemoveRoutes {
 Get-NetRoute | where {$_.InterfaceAlias -eq $GLOBAL:alias} | Remove-NetRoute -confirm:$false
}

function AddRoutes {
 RemoveRoutes #Just in case clean up any previous routes for this Interface

 New-NetRoute -DestinationPrefix "10.50.0.0/16" -InterfaceAlias $GLOBAL:alias -NextHop $GLOBAL:IpAddresse.IpAddresse
 New-NetRoute -DestinationPrefix "10.70.20.0/24" -InterfaceAlias $GLOBAL:alias -NextHop $GLOBAL:IpAddresse.IpAddresse
 New-NetRoute -DestinationPrefix "10.90.30.0/24" -InterfaceAlias $GLOBAL:alias -NextHop $GLOBAL:IpAddresse.IpAddresse
}

#-----------------------------------------------------------------------------------
#Connect and run the logon script
#-----------------------------------------------------------------------------------
# We Don't have an IP in our Azure P2S range(s) so let just exit
if ($GLOBAL:IpAddresse -eq $nul){
    exit 1
}

AddRoutes

#Optional: Call the logon script
#Invoke-Expression "\\mydomain\netlogon\Logon_Script.vbs"
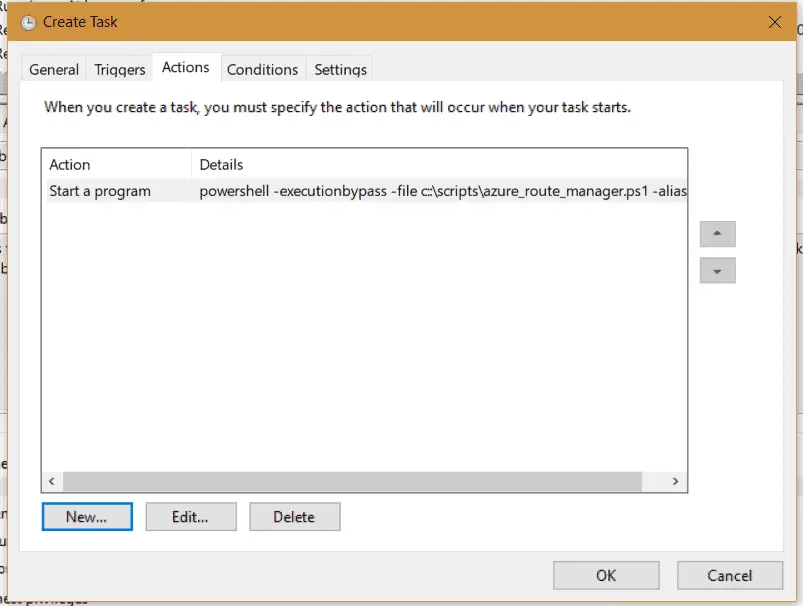
The Scheduled Task
Deploy a scheduled task to the users computers, you could use Group Policy Preference if you don’t have anything better.
My task looks a bit like this. The action is powershell.exe -executionbypass -file c:\scripts\azure_route_manager.ps1 -alias “Company Name Primary Connection”
- You will need to change the path to match your script name and location.
- Change “Company Name Primary Connection” to match the ServiceName in the .cms file (line 46)


Modify the .cms file to trigger the scheduled task on connection
- Edie the .cms file
- Find the [Connect Action] section around line 85

- Change the section to look like this
[Connect Actions]
0=schtasks /run /tn "Azure VPN Primary Route Management"
0&Description=to update your routing table

- Make sure the task name matches your scheduled task name. Note: the “flags” line has been removed.
- Save and close the file
Creating a batch file to install the modified client
- In the folder with the extracted files create a “install.bat”
- Edit the install.bat file and past in the below, replacing the .inf filename with your own.
@echo off
cmstp /s /au "f0219wqf-ewb9f-418c-a54f-2748e4a23b04.inf"
- In this case I am using the parameters /s for a silent install and /au for an all user install. Full arguments can be found here
- Note CMSTP does not support running from a UNC path so you will need to copy the folder local first before running the batch file. Or build that into the batch file or your deployment process.
- Note: Even with the /au parameter this will need to be run your each use to add the connection.
Hi,
I’ve been trying to work through this. A couple of issues:
It’s not possible to create the scheduled task for the System account under a standard user. If running the snap in as an admin, the task appears to be created only for that admin user.
I tried granting myself admin rights and setting it up. That appears to work ok. But the install.bat / cms scripts don’t appear to invoke the task. The route dont appear when doing a route print and the task doesn’t look like it has run.
Any ideas? Is there any error checking / logging that we could enable?
This is great. Thank you!
One question: how do I “recompile” the files into a new .exe that I can distribute?
Same as @Norma
You need to run “%windir%\system32\iexpress.exe”.
1) Extract files and run an install command
2) Give it a package name (eg. ITVPN.azure)
3) Prompt User with “Do you want to install VPN?”
4) Don’t display licence
5) Add all the package files from your directory
6) Install program:
cmstp.exe /s /su /ns {REPLACELONGUIDHERE}.inf
eg. cmstp.exe /s /su /ns 96210074-f1ad-469c-ac00-b724f8c62605.inf
7) Hidden
8) No Message
9 ) Choose a location
Phil, Getting two errors – when I run the install.bat it executes the CMSTP Command and then tells me it cannot find “profile name”.cmp Second after it’s run the install.bat and I attempts to connectthe profile I see a message The Service profile is damage. Reinstall the service profile.
The syntax of the copy error is setup cannot copy the files “profilename”.cmp. it appears to be looking for a file with the same name as the .INF there is no .CMP File there is a .CER, .CMS., .PBK and a .INF so I am missing something.
Hi Phil,
I’ve tried your method and only encounter 1 issues. The task scheduler is not running. I can connect the VPN just fine and when I do the route print, I didn’t see the route added. Any tips on how I can troubleshoot this?
Thanks in advance.
Hi,
Is the scheduled task set to run as the system user, see the first screenshot in the “THE SCHEDULED TASK” section above. Standard users can’t add routes, so the task needs to run as system or an admin.
If not check the history for the task to confirm if it is running and if there are any useful messages in the log.
Hope this helps?
Thanks
Phil
I´m having the same issue.
If I right click the task and run it, it creates the routes, but when I connect the VPN seems like the 0=schtasks /run /tn “Azure VPN Primary Route Management” cannot run the task. After connecting the VPN I look at the last execution time but it has never run.
If I open a evelated command prompt and run schtasks /run /tn “Azure VPN Primary Route Management” it run and create the routes.
If I open a normal command prompt it cannot run schtasks /run /tn “Azure VPN Primary Route Management” and return Error access denied.
This looks very helpful! My only confusion is the powershell script. Am i replacing lines 15,16 and 17 with my own required routes from my routes.txt?
Hi Phil,
This is a fantastic instruction guide you have here. I have followed it line by line and it has worked for me with any issue. Great work !
I have a query, when we running the task by changing the below in the .cms file. Can we run another task by adding it to the below section ?. f yes what would the format look like
[Connect Actions]
0=schtasks /run /tn “Azure VPN Primary Route Management”
0&Description=to update your routing table
Thank you in adv
Royd
Hi Royd,
Thanks for the feedback, I’m glad the post helped.
To be honest I have never attempted to add more than one, but the fact the section is titled [Connect Actions] plural. That would suggest more than one action is supported. I would assume you second action would be prefixed with 1=
[Connect Actions]
0=my first action
1=my second action
Give it a try and let us know.
If not you can always put all your required action into a batch file or script and call that with the 0= line.
Thanks
Phil
Hi Phil,
Thank you for those suggestions and appologies for getting back late.
The option 1 (see below) worked for, i had tried it previously but after your suggestion i did it all over again with a fresh mind.
[Connect Actions]
0=my first action
1=my second action
Keep up the good work.
Kind Regards,
Royd
Excellent, glad you got it working.
Stay safe
Phil
Hi Phil,
As some of them have mnetioned above, as a syandard user the task do not get executed, but when i try and connect the VPN client on a laptop with the user having administrative privileges the task work just fine and the routes are mapped.
Regards,
Royd
so you have your power Shell script but dont mention changing anything in the script should I be putting My routes in there? also the script is constant “Access is denied” for every route it tries to add or remove.
what am i missing, do I edit to match my routes which i have tried how do I run the script with out all the access errors.
I can connect to the vpn but cannot ping anything.
Yup you will have to add the routes in the Powershell script.
You will have to deploy this script once with admin permissions.
Azure really sucks compared to AWS. Any services in Azure is immature. Changing one setting in Azure takes ages to apply.
Thanks for the article. Do you know if there’s a way to actually deploy the VPN client this depends on?
I have Windows 10 Pro (not enterprise) and to not have InTune.
If the app is only available in the store, would I have to use a AppxBundle download of it and deploy that to the user as the user?
Thanks a lot! I’m using this with AzureVPN Basic in combination with the scheduled task.
Works like a charm!
One thing to mention though:
Out of the box regular (non-admin) users won’t be able to run a scheduled task.
But you can give your users permissions to explicitly run this task by tweaking reg entries: (see https://social.technet.microsoft.com/Forums/en-US/6b9b7ac3-41cd-419e-ac25-c15c45766c8e/scheduled-task-that-any-user-can-run?forum=win10itprogeneral)
I modified the install script to fit my needs.
This is what I’m deploying:
@echo off
cmstp /s /au “f00a0069-556e-4f72-9aa4-eb96caf05097.inf”
schtasks /create /xml “Azure VPN Primary Route Management.xml” /tn “Azure VPN Primary Route Management” /ru “SYSTEM”
Powershell.exe -ExecutionPolicy remotesigned -file UnlockScheduledTask.ps1 -taskname “Azure VPN Primary Route Management”
Hi,
How can I restrict the client certificate used to authenticate against Azure VPN?
If there are multiple certificates in the certificate store, Azure VPN just pickup the first one in the list.