
Recently I had the need to write a script to query and set data in Azure AD using PowerShell. I didn’t want to create or use a user account, using hard coded credentials in a script is never a clever idea.
I wanted my script to authenticate as a Service Principal with just the permissions required. However, I couldn’t find a good example for what I was attempted to do. So hopefully the below will help someone.
I was originally planning to use Connect-AzureAD connecting via a Service Principal. However as of June 2022 the “Azure Active Directory Graph” API’s witch the AzureAD modules need will be deprecated. So, time to embrace Microsoft Graph!
In this post we will be creating
- A certificate used for authentication.
- Creating an Azure AD application / service principal where the permissions our script will need will be defined.
- Getting the required IDs and other properties needed for authentication.
- Creating a basic script to prove authentication works as expected.
The Steps:
- Create a self-signed certificate
- Convert the certificate to Base64
- Creating an Azure Active Directory Application
- Installing the certificate
- Getting the properties for the script
- Sample PowerShell Script
- You may also like
Create a self-signed certificate
One of the things I like about this method of authentication is any computer that needs to run the script will also need the certificate we are about to create. So, if the script falls into the wrong hands or is run on a computer/user other than where it was indented, it will fail.
We are going to create a self-signed certificate in this example to reduce cost, an existing public certificate would also work fine. Make sure you keep a copy of the certificate and certificate password in a secure place.
Open an admin PowerShell prompt and run the below, replacing
- “MyVeryComplexString1234” with your own complex password.
- NotAfter (Get-Date).AddMonths(24) here we are setting the expiring date for the certificate, now + 24 months in this case. Adjust as required
- “c:\temp\examplecert.pfx” with where you would like a copy of the certificate saved
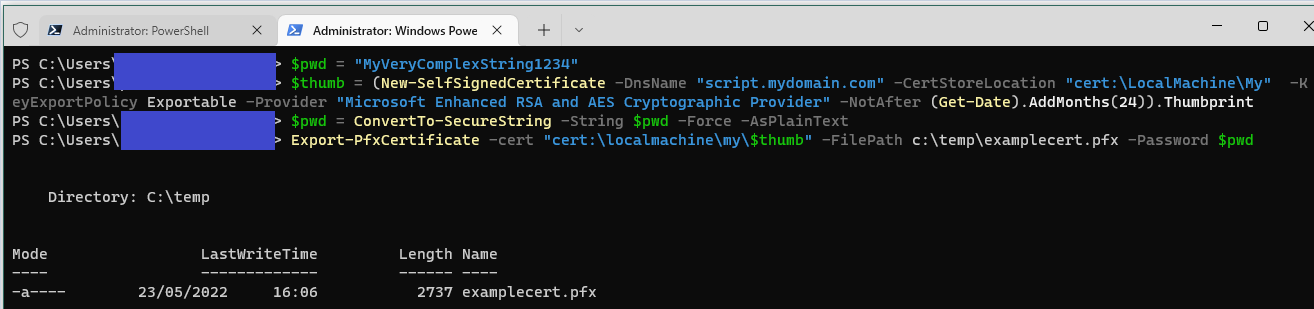
$pwd = "MyVeryComplexString1234"
$thumb = (New-SelfSignedCertificate -DnsName "script.mydomain.com" -CertStoreLocation "cert:\LocalMachine\My"  -KeyExportPolicy Exportable -Provider "Microsoft Enhanced RSA and AES Cryptographic Provider" -NotAfter (Get-Date).AddMonths(24)).Thumbprint
$pwd = ConvertTo-SecureString -String $pwd -Force -AsPlainText
Export-PfxCertificate -cert "cert:\localmachine\my\$thumb" -FilePath c:\temp\examplecert.pfx -Password $pwd
Convert the certificate to Base64
Before we can upload the certificate to Azure, we need to convert the certificate to Base64. You could use the certificates MMC snap-in as we marked the certificate as exportable or run the below PowerShell, replacing
- “C:\temp\examplecert.pfx” with where the exported PFX was exported from the previous step
- “MyVeryComplexString1234” with your own complex password from the previous step
- Out-File c:\temp\examplecert_base64.crt with where you want to save the base64 certificate
$cert = New-Object System.Security.Cryptography.X509Certificates.X509Certificate("C:\temp\examplecert.pfx", "MyVeryComplexString1234")
$keyValue = [System.Convert]::ToBase64String($cert.GetRawCertData()) | Out-File c:\temp\examplecert_base64.crt
Creating an Azure Active Directory Application
- Logon to your Azure admin portal (https://portal.azure.com/) with an account that has permissions to register applications.
- Under Manage click App registrations
- Click New registration
- Give your application an appropriate name
- Use the “Select a platform” drop to select “Web”
- Click Register
- Click Manage => API permissions Here you can define what permission(s) your script will have, for example to read the properties of all AzureAD users you could add Microsoft Graph “User.Read.All”

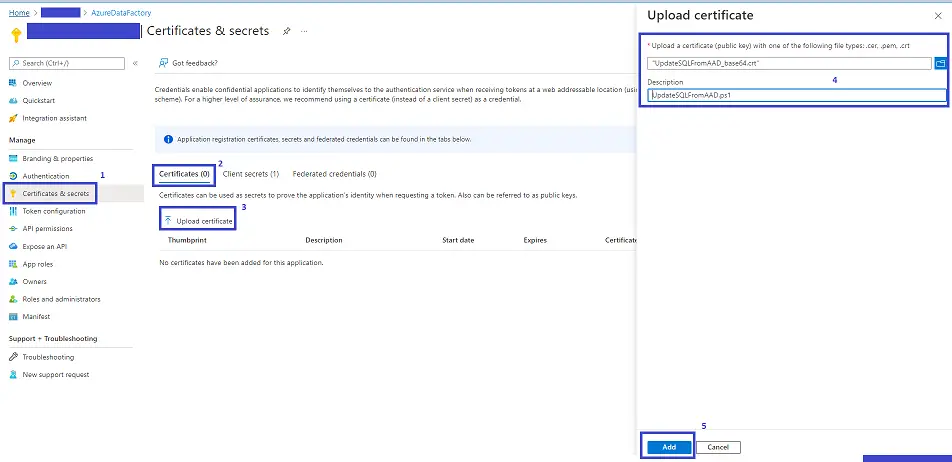
- Click Manage => Certificates & secrets => Certificates
- Click Upload Corticate
- Browse to and select your previously converted base64 .crt certificate and add a description. I like to use my script name. Click Add
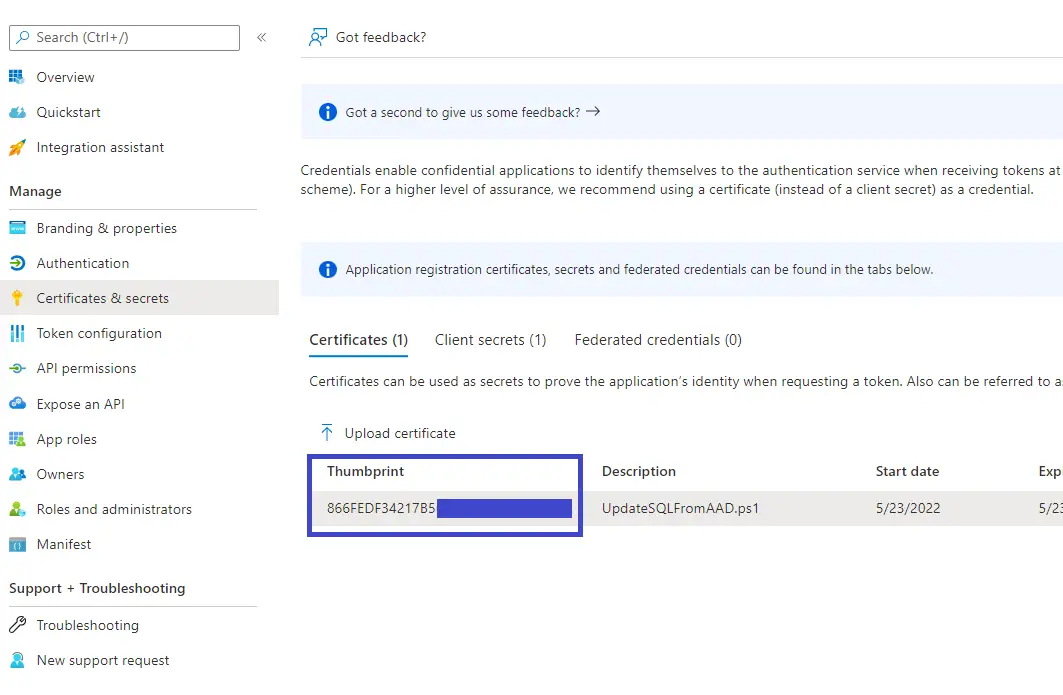
- Copy the thumbprint, we will need this later when authenticating from the script
Installing the certificate
On any computer and/or user that will run your script the certificate will need to be installed.
- Double-click the previously exported PFX file
- Either select current user or local computer depending on if you want all users on the computer to able to run the script or just the correct user. Click Next, Next
- Exter the previous set password, Next, Next, Finish, Ok
Getting the properties for the script
$tenantID – Your Tenant ID
Found on Azure AD under Manage => Properties =>Tenant ID
$applicationID – Your Application ID
On the overview page or your created App registration “Application (client) ID”
$thumbprint – Your Certificate Thumbprint
In the “Certificates & secrets” section of you created App registration
Sample PowerShell Script
Below is a sample script to authenticate using the above created certificate and list all Azure AD users in the directory.
Note: At the time of writing PowerShell 7 was not supported.
# Connect to Azure
$tenantID = "<Your Tenant ID>"
$applicationID = "<Your Application ID>"
$thumbprint = "<Your Certificate Thumbprint>"

Connect-MgGraph -ClientID $applicationID -TenantId $tenantID -CertificateThumbprint $thumbprint

# Ger all Azure AD Users
Get-MgUser
I followed the instructions and when I tried to install the certificate, it didnt prompt me for any password as you mentioned. Also I am running into this error.
Connect-MgGraph : 566158B28314A61763A72******************
certificate was not found or has expired.
At line:6 char:1
+ Connect-MgGraph -ClientID $applicationID -TenantId $tenantID -Certifi …
+ ~~~~~~~~~~~~~~~~~~~~~~~~~~~~~~~~~~~~~~~~~~~~~~~~~~~~~~~~~~~~~~~~~~~~~
+ CategoryInfo : NotSpecified: (:) [Connect-MgGraph], Exception
+ FullyQualifiedErrorId : Microsoft.Graph.PowerShell.Authentication.Cmdlets.ConnectMgGraph
Keep getting get-mguser : Insufficient privileges to complete the operation.
I have API user.read.all and directory.read.all and admin grant consent.
Though, your guide doesnt mention API permissions.