I recently had the requirement to allow a few accounts remote access to a server via RDP for support purposes. I elected to use a Fortinet FortiGate firewall with an SSL VPN Portal linked via SAML to Azure AD.
This gives the benefit of the users being able to login using their Azure AD account and you can enforce the use of MFA and other conditions via Condition Access
This guide will cover the steps followed. The screenshots are taken from a FortiGate firewall running v7.0.1. But I have tested and it is pretty much the same for v6.4.6 and works fine on that release for both physical and virtual models. Possibly earlier versions will work too but I personally have not tested.
Table of Contents
- Azure AD User(s) and Group
- Creating an Azure AD application
- Getting your FortiGate SSL VPN URL
- Configuring the Azure AD application
- Giving permissions to your application
- Collecting the details needed for the FortiGate setup
- FortiGate Config – Uploading your application certificate
- FortiGate Config – SAML Setup
- FortiGate Config – Mapping local group to the Azure AD group
- FortiGate Config – Firewall Policy
- FortiGate Config – Timeouts
- FortiGate Config – Creating an SSL Portal
- FortiGate Config – User to SSL Portal Mapping
- Testing it
- Troubleshooting
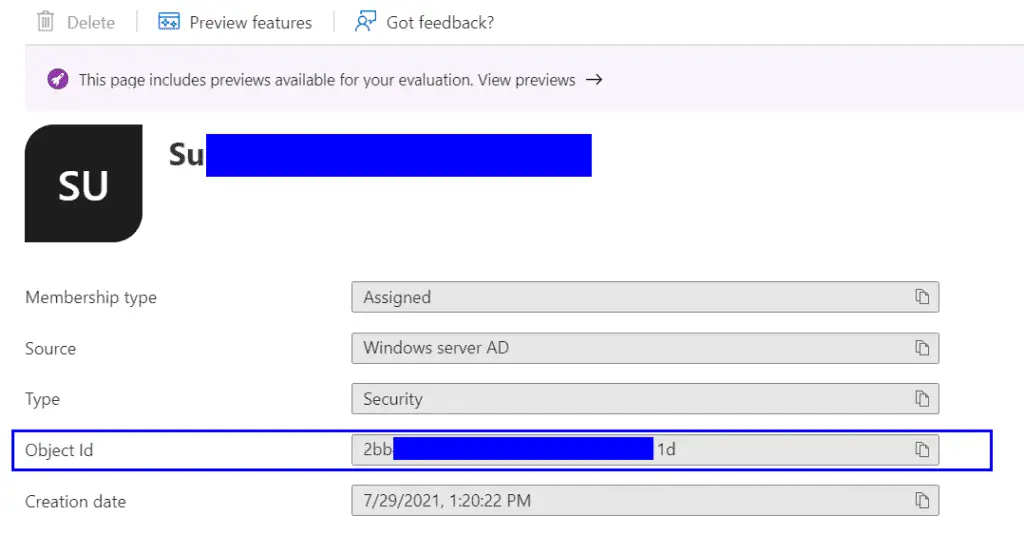
Azure AD User(s) and Group
- If your user(s) who will be using the SSL VPN portal don’t already exist create them.
- You will also need to create a group and add the user(s) who will be using the SSL VPN portal as members.
- After your group is created take a note of the “Object id” as you will need it later.
Creating an Azure AD application
The first thing we will need to do is create an Enterprise Application within the Azure AD subscription, as this is what the SMAL requests will authenticate against.
- Logon to you Azure portal and open the Azure Active Directory blade
- Click “Enterprise Applications” on the left
- Click “New application”
- Search for “Fortigate” and select the “FortiGate SSL VPN” template.
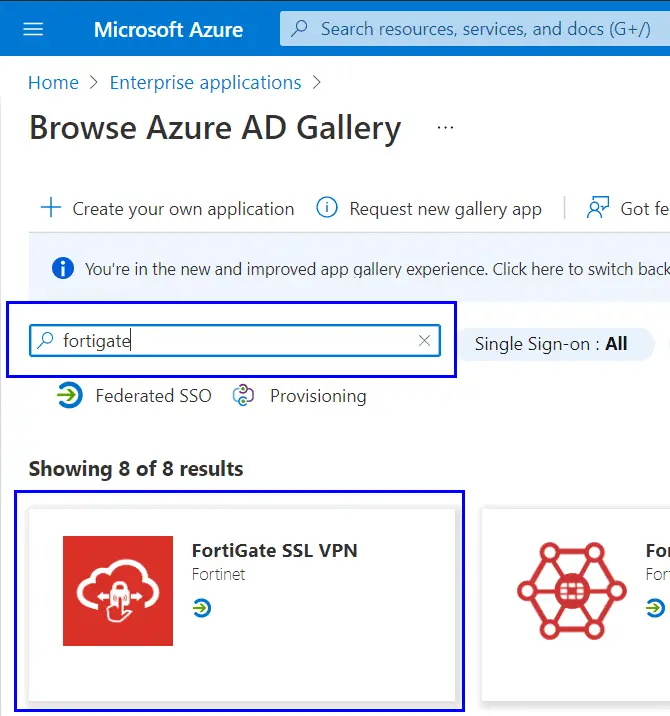
- Give your application a name and press “Create”
Getting your FortiGate SSL VPN URL
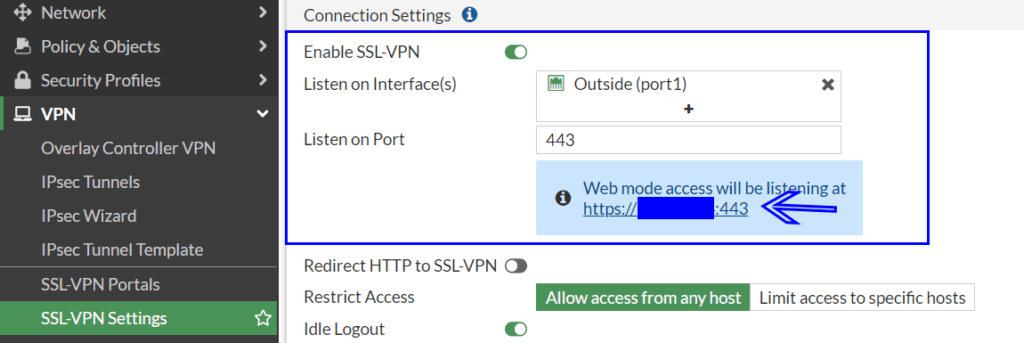
- On your FortiGate firewall VPN => SSL-VPN Settings
- Make sure “Enable SSL-VPN” is on.
- Make sure you “Listening on (interfaces)” is set as required. Port 1 generally being the outside internet facing interface.
- Take a note of the “Web mode access will be listening at” URL as we will need this in the next section.
- If you have a DNS name pointing to the public IP address of the SSL Portal you can use that instead, but you will still need the port (if it is not 443)
- i.e https://172.5.6.7:10443 can become https://aRecord.mydomain.com:10443 if you have the DNS records setup.
Configuring the Azure AD application
After your new application is created (can take a few seconds) you will be redirected to your applications settings page. If not you can search for your application’s name in the Enterprise Application blade.
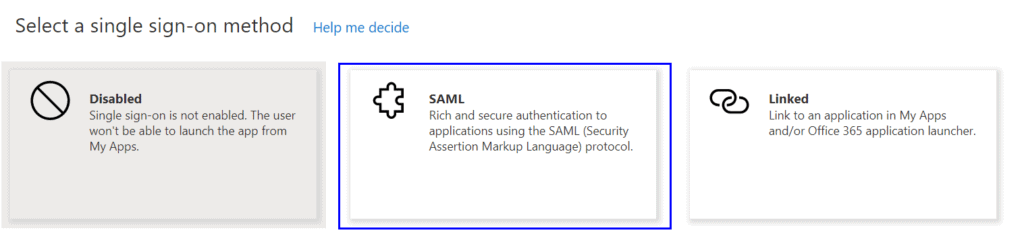
- Click “Setup single sign on”
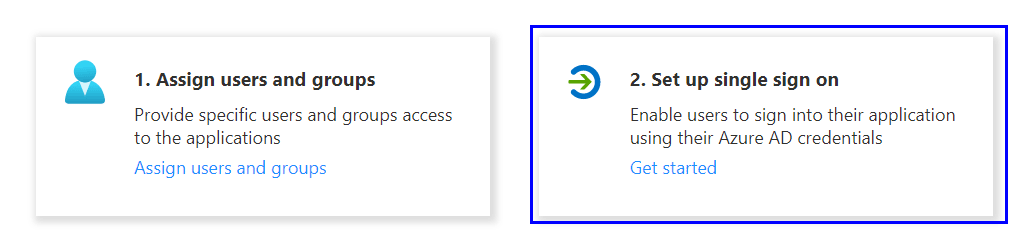
- Click the “SAML” option
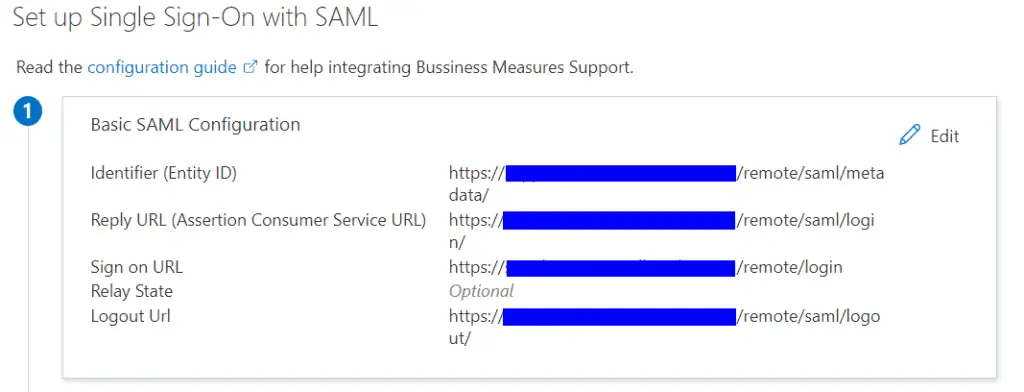
- Click the edit item for Section 1 “Basic SAML Configuration” and set these values
- Replacing <myforti.com> with external the public facing IP Address or DNS name for you firewall.
- Replacing <port> with the port number set in the “SSL-VPN Setting” section of your FortiGate
- For “Identifier (Entity ID)” and “Reply URL (Assertion Consumer Service URL)” tick the Default check box on the right. Click Save
| Parameter | Value |
|---|---|
| Identifier (Entity ID) | https://<myforti.com>:<port>/remote/saml/metadata/ |
| Reply URL (Assertion Consumer Service URL) | https://<myforti.com>:<port>/remote/saml/login/ |
| Sign on URL | https://<myforti.com>:<port>/remote/login |
| Relay State | Leave Blank |
| Logout Url | https://<myforti.com>:<port>/remote/saml/logout/ |
Section 1 should not look like this.
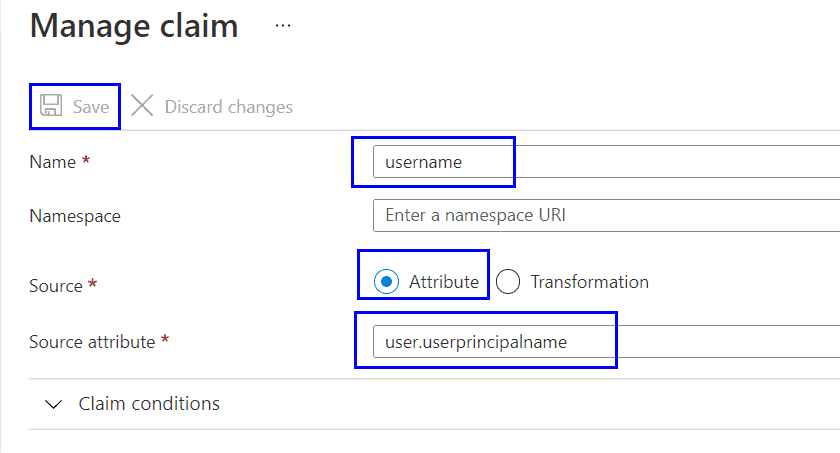
- Click the edit button for Section 2 “User Attributes & Claims”
- Click “Add new claim”
- Name: username
- Source: Attribute
- Source attribute: user.userprincipalname
- Click Save
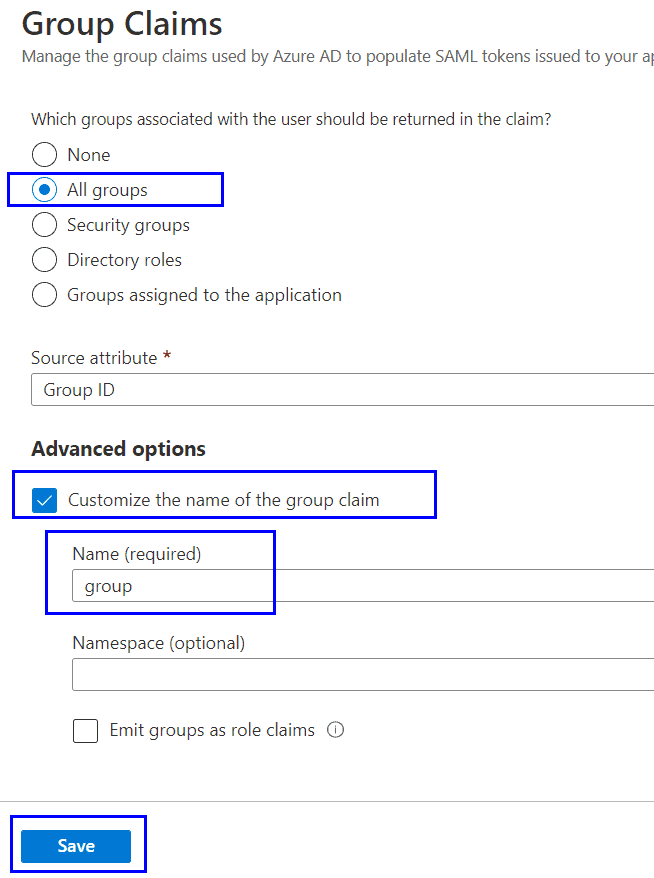
- Click “Add new group claim”
- Select “All groups”
- Select the “Customize the name of the group claim” check box.
- Name: group
- Click Save
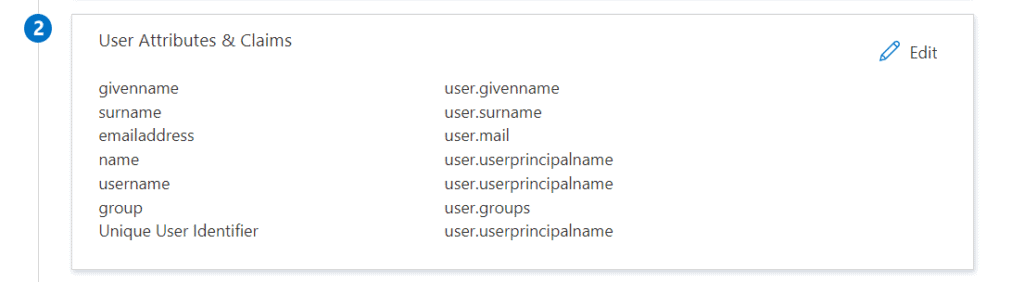
The “Single sign on” section 2 for your application should now look like this.
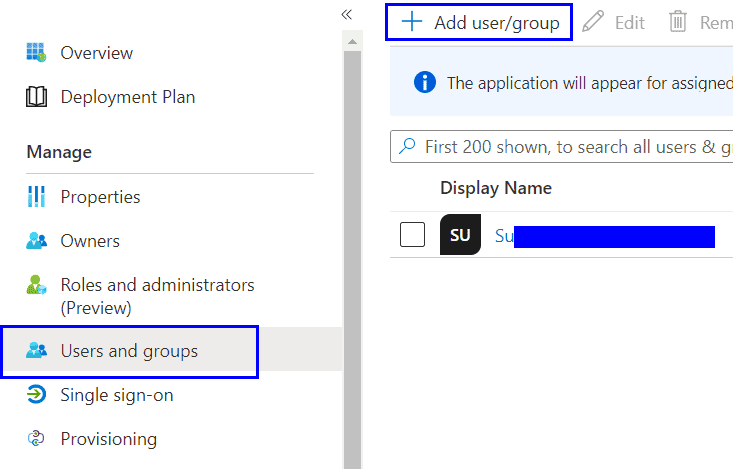
Giving permissions to your application
In the “Users and groups” section for your Enterprise Application add the group you previously created at the start of this guide.
Collecting the details needed for the FortiGate setup
As mentioned in the “User and Groups” section above you will need your group “Object id”
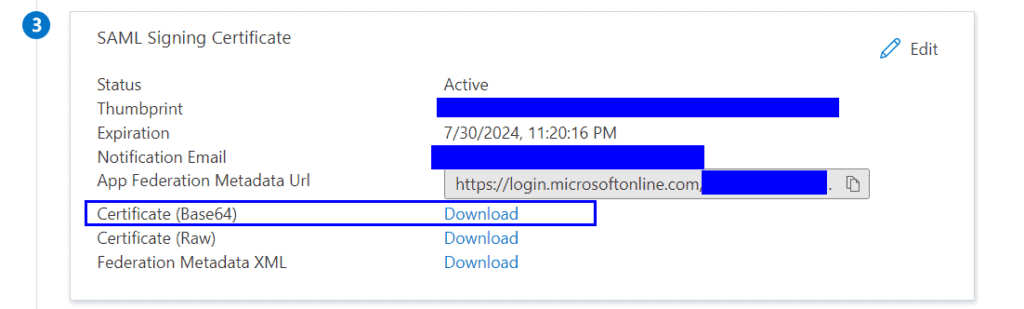
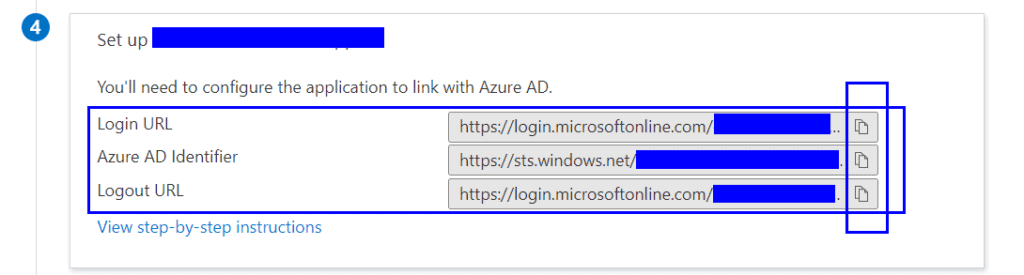
In the “Sigle sign-on” section for your Azure AD application you will need to download the “Certificate (Base64)” from section 3
In the “Sigle sign-on” section for your Azure AD application you will need to copy the “Login URL”, “Azure AD Identifier” and “Logout URL” from section 4
FortiGate Config – Uploading your application certificate
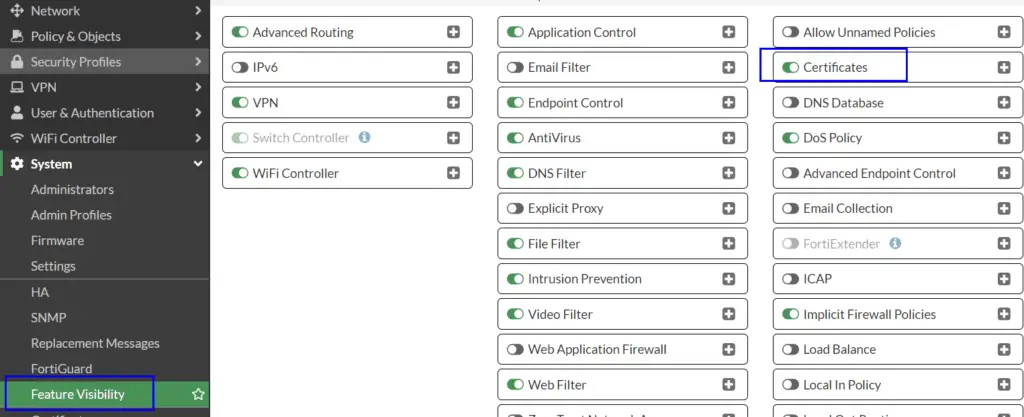
- Logon to your FortiGate firewall and head to System => Feature Visibility
- Make sure “Certificates” is set to On
- Head to System => Certificates
- Select Import => Remote Certificate
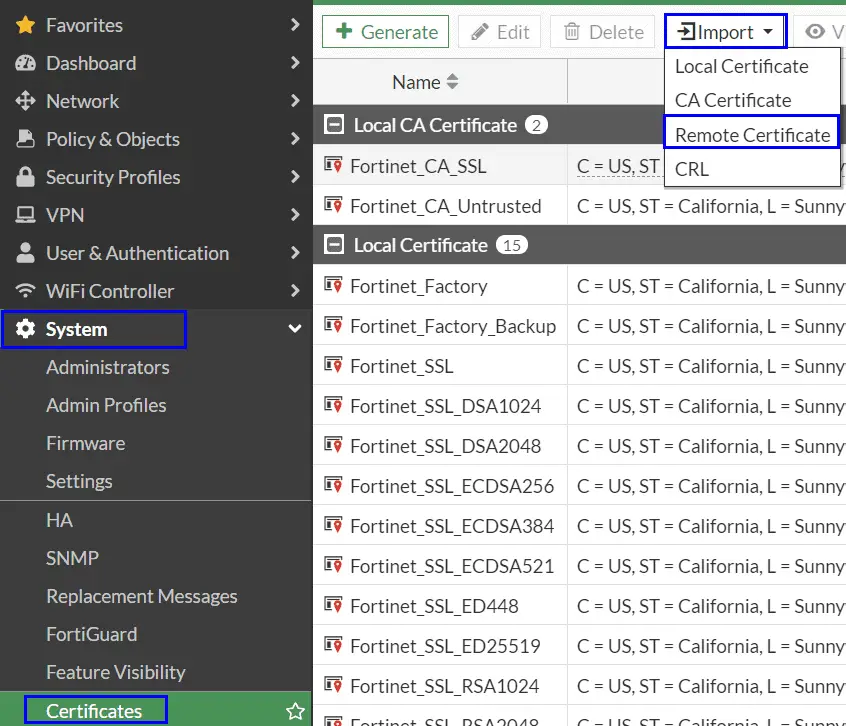
- Upload the certificate for you Azure AD application you previous downloaded.
- The certificate will be imported at the very bottom in the “Remote Certificates” section. Unless you already have any others it will get the name “REMOTE_Cert_1”. Make a note of the name as we will need it later

FortiGate Config – SAML Setup
I don’t believe we can currently use the GUI for this part so either SSH into your firewall or use the “CLI Console” icon in the top right.
Run these commands subtitling the values for your own;
config user saml
    edit "AZURE-SAML"
        set cert "ServerCertificateName"
        set entity-id "https://<myforti.com>:<port>/remote/saml/metadata/"
        set single-sign-on-url "https://<myforti.com>:<port>/remote/saml/login/"
        set single-logout-url "https://<myforti.com>:<port>/remote/saml/logout/"
        set idp-entity-id "https://sts.windows.net/aaa-bbb-cccc-dddd-eeee/"
        set idp-single-sign-on-url "https://login.microsoftonline.com/aaa--bbbb-cccc-dddd/saml2"
        set idp-single-logout-url "https://login.microsoftonline.com/aaaa-bbbb-cccc-dddd/saml2"
        set idp-cert "REMOTE_Cert_1"
        set user-name "username"
        set group-name "group"
    next
end
Where:
| Command | More Info |
|---|---|
| edit “AZURE-SAML” | AZURE-SAML Is a display name. If you intend to have more than one SSL Portal linked to SAML maybe add in the application name. |
| set cert | ServerCertificateName Is the name of the “Server Certificate” on your FortiGate under VPN => SSL-VPN Settings |
| set entity-id | https://<myforti.com>:<port>/remote/saml/metadata/ If the URL you entered as the “Identifier (Entity ID)” when setting up the “Basic SAML Configuration” of the application |
| set single-sign-on-url | https://<myforti.com>:<port>/remote/saml/login/ Is the URL you entered as the “Reply URL” when setting up the “Basic SAML Configuration” of the application |
| set single-logout-url | https://<myforti.com>:<port>/remote/saml/logout/ Is the URL you entered as the “Logout URL” when setting up the “Basic SAML Configuration” of the application |
| set idp-entity-id | https://sts.windows.net/aaa-bbb-cccc-dddd-eeee/ Is the “Azure AD Identifier” you copied from section 4 when setting up single sigin-on for your application |
| set idp-single-sign-on-url | https://login.microsoftonline.com/aaa–bbbb-cccc-dddd/saml2 Is the “Login URL” you copied from section 4 when setting up single sigin-on for your application |
| set idp-single-logout-url | https://login.microsoftonline.com/aaaa-bbbb-cccc-dddd/saml2 Is the “Logout URL” you copied from section 4 when setting up single sigin-on for your application |
| set idp-cert | REMOTE_Cert_1 Is the name that was assigned when you imported your applications certificate into your FortiGate |
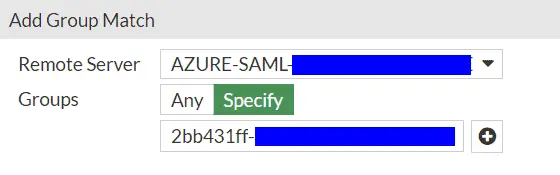
FortiGate Config – Mapping local group to the Azure AD group
- Select Users & Authentication => User Groups
- Create “Create New”
- Name: Set as the same as the group name created in Azure AD
- In the “Remote groups” section click “Add”
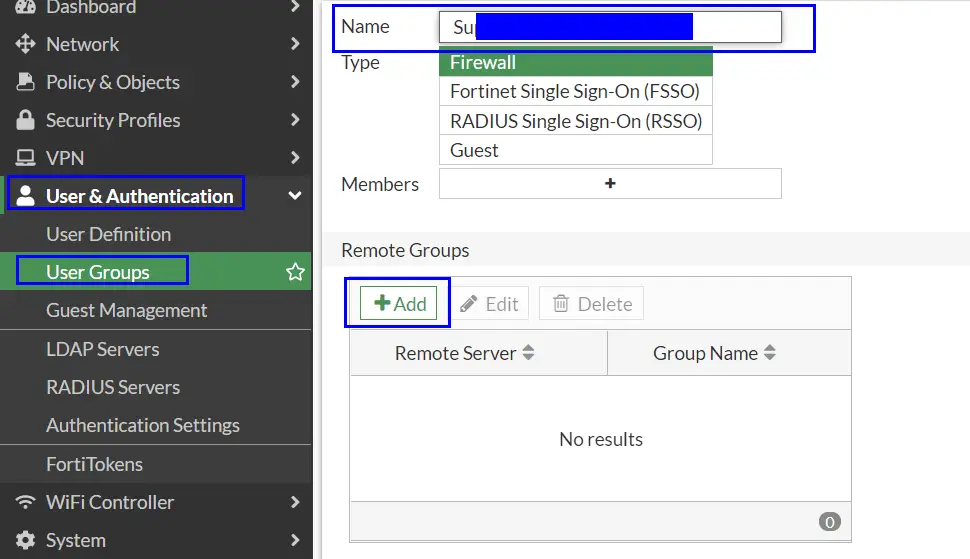
- Remote Server: Select the connection name you used
- Groups: Specific
- Group Name: paste in the groups “Object id” copied at the start on this guide.
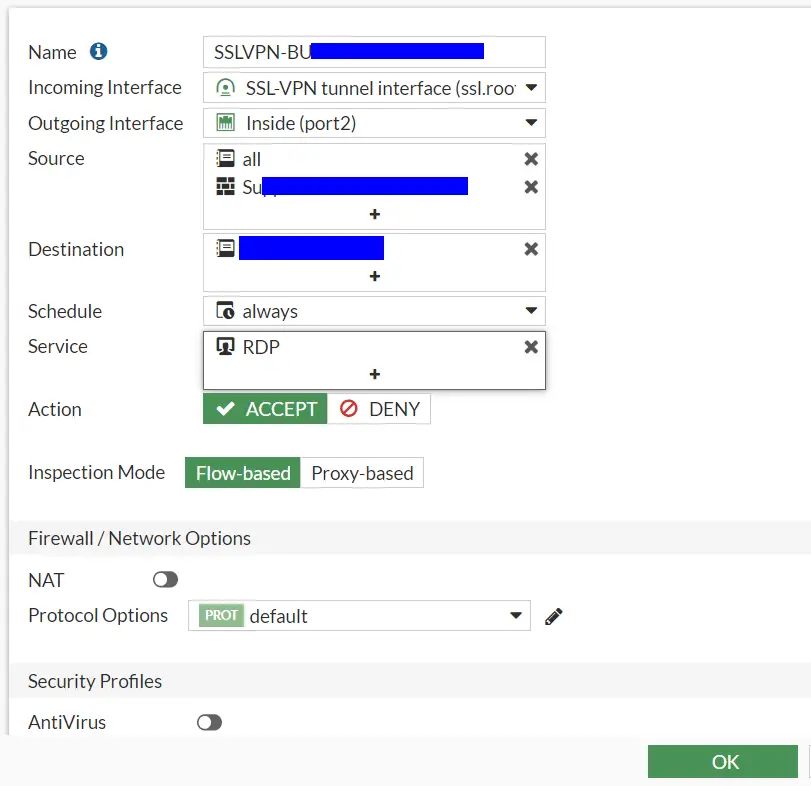
FortiGate Config – Firewall Policy
Note: You have more than one SSL Portal the firewall rules order becomes import as users will be mapped to the first portal where the conditions are met.
- Navigate to Policies & Objects => Firewall Policy
- Create new
- Name: Something descriptive
- Incoming Interface: Your SSL-VPN tunnel interface
- Outgoing Interface: Your inside interface if you are wishing to access service(s) on the inside
- Source: Your SAML group and either all or specific IP source(s)
- Destination: The service(s) you want to access
- Services: Services to allow. I only need RDP
FortiGate Config – Timeouts
You may not need this, but just to be sure I increased the timeouts with the below commands
config system global
    set remoteauthtimeout 180
end

config vpn ssl settings
    set login-timeout 180
end
FortiGate Config – Creating an SSL Portal
- Navigate to VPN => SSL-VPN Portals
- Click “Create New”
- Give it a name
- Turn off tunnel mode (unless you need it)
- Set the required options and bookmarks
FortiGate Config – User to SSL Portal Mapping
- Navigate to VPN => SSL-VPN Settings
- At the very bottom click “Create new” in the “Authentication/Portal Mapping” section
- Add a rule to map your group to your portal
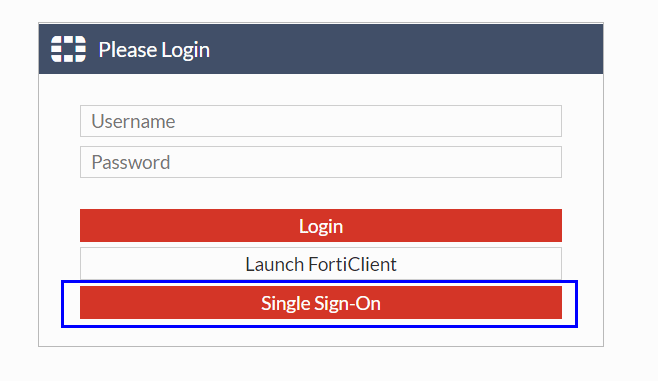
Testing it
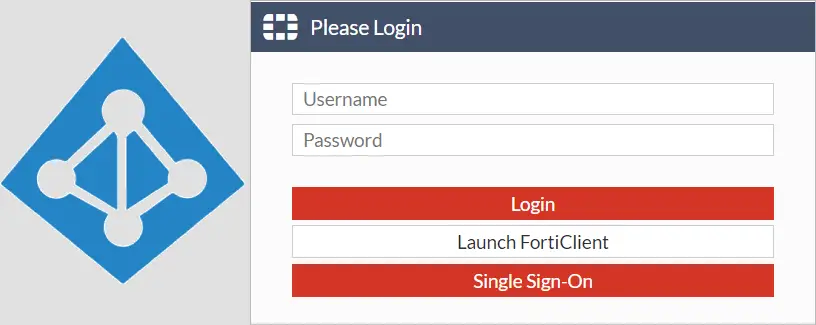
Visit your SSL VPN URL and you should have a “Single Sign-On” button. Press it and you should either be auto signed in or be prompted for your Azure AD credentials.
You should then be directed to the correct SSL Portal.
Troubleshooting
Useful debug commands
diag debug reset
diag debug console timestamp enable
diag debug app sslvpn -1
diag debug app samld -1
diag debug enable
Hi,
Great resource, thank you!
In your section: “FortiGate Config – Mapping local group to the Azure AD group”, nothing showed up under “Remote Server” when creating the group. I had to follow the instructions here to do this by the command line, and then it worked: https://yura.stryi.com/en/2021-03-05/fortigate-ssl-vpn-azure-mfa/
config user group
edit “SAML_AZ_ALL”
set member “azure-saml”
config match
edit 1
set server-name “azure-saml”
set group-name “YYY-a79a-40f0-a2df-XXX”
next
end
next
end
Hi,
Glad it helped and thanks for the share!
Out of curiosity what version of FortiOS are you running?
Thanks
Phil
6.4.7
Hi Just confirming 6.4.8 has the same issue thanks Nikhil!
6.4.6 works
What is unclear to me:
Is this also possible with an on-prem fortigate? Or just FGT-VM’s in Azure?
Are the Azure AD Identities also useable as “user” in policies (like with FSSO)?
Either or
By default, it seems the “Add a group claim” is greyed out , you need to the existing group claim before you add the one above
“Once a group claim configuration has been added to the User Attributes & Claims configuration, the option to add a group claim will be greyed out.”
There is already a group claim you can edit, no need to create a new one
On 6.4.8 there is no button to Sigle Sign On, redirection happens automatically!
Hi!
I got i fixed on Forti OS 6.4.8 on Web mode.
But on tunnel mode i get a -7200 issue, do you have some advice?
Hi I’m getting the same error. did you figure out how to fix this issue?
Me too…
Awesome blog! Worked perfectly! Thank you!
Hi,
I have a azure plan free.. Only allow users and not groups… in fortigate policies how i add and mapping the user with ssl-azure-smal?? Only appears to choose groups… 🙁
Please help me.
Thanks
How to configure Different SSL portal on same FGT box for two separate SAML tenants.
for eg: https://1.2.3.4:10443 – serves SAML-1 ( Azure Tenant )
https://1.2.2.2:10443- serves SAML -2 (Azure Tenant )
Can I use this just to do FortiClient VPN login + MFA? without buying Fortitokens …
Can I use this just to do FortiClient VPN login + MFA? without buying Fortitokens …
Absolutely