In this guide, I will cover the basic setup to enable a Cisco router to connect to a VDSL2 / FTTC circuit. I will cover the full setup of the router including enabling SSH and enabling DHCP.
If you need to break into the router first because you don’t have the password take a look at this post How to break into a Cisco device
Table of Contents
- Basic setup
- Settings the console password
- Setting the routers management IP
- Setting up remote SSH access
- DHCP
- Setting up VDSL / FTTC
- Setting up NAT
- Routes
- More on the subject of Cisco
If you are new to Cisco or just want to improve your skills I recommend this course from Udemy at the time of writing for just $20 for lifetime access! I’m also a really big fan of Pluralsight
Basic setup
When you first power on a new factory defaulted router you will be asked “Would you like to enter initial configuration dialog?” enter no and press enter

Enter the following commands, this will;
- Set the devices host name as WAN.
- Sets any passwords we enter into the devices to be stored encrypted rather than plain text.
- Sets the enable password to be 3n4bl3M3 – Replace the password with ont of your own
- Sets the DNS servers the device will use to be Googles
enable
configure terminal
hostname WAN
enable secret 3n4bl3M3
ip name-server 8.8.8.8
ip name-server 8.8.4.4
exit
Settings the console password
To set a password to be required when connecting via the console port, enter the following
Replace C0ns013 with whatever password you want to use.
enable
configure terminal
line con 0
password C0ns013
login
exit
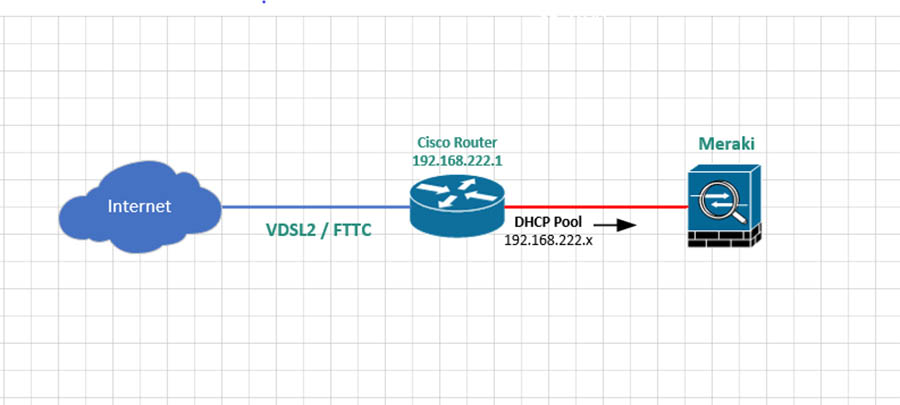
Setting the routers management IP
Now we are going to set the management IP. This is the IP address we will be able to use the remotely manage the device. It is also going to be the default gateway for any client devices connected to the router.
Amend the address as required.
int vlan 1
ip address 192.168.222.1 255.255.255.0
Setting up remote SSH access
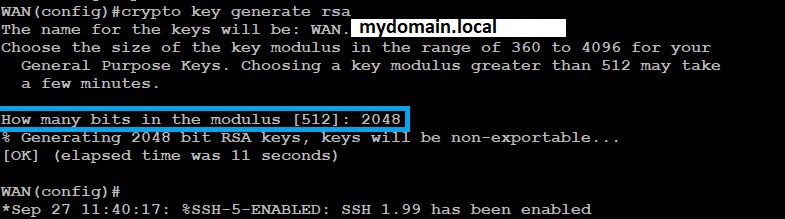
So we can securely remotely manage the device we will need to set up SSH using the following
Replace mydomain.local with your domain name
ip domain-name mydomain.local
crypto key generate rsa
You will be asked “How many bits in the modulus” enter 2048 and press enter.
ip ssh version 2
line vty 0 4
 transport input ssh
 login local
 exit
Change the username admin and the password SSHPa55w0rd to be the SSH credentials you wish to use on the username line
username admin password SSHPa55w0rd
DHCP
Now we are going to set up DHCP so any devices connected to the LAN ports on the router are issued an IP address.
In this example, I am going to use the range 192.168.222.0 255.255.255.0 but change this as required to meet your needs. I am also going to exclude the first ten IP addresses in the range from being issued by DHCP. You would at the very least want to exclude the router’s management IP 192.168.222.1 in this example
ip dhcp pool CLIENTS
 network 192.168.222.0 255.255.255.0
 default-router 192.168.222.1
 dns-server 8.8.8.8 8.8.4.4
exit

ip dhcp excluded-address 192.168.222.1 192.168.222.10
Setting up VDSL / FTTC
Change PPPoE-Username-From-ISP and PPPoE-Password-From-ISP to be your PPPoE username and password provided by your ISP.
wan mode dsl

controller vdsl 0
 no shut

interface Ethernet0
 no ip address
 ip virtual-reassembly in
 pppoe-client dial-pool-number 1
 no shut

interface Ethernet0.101
 encapsulation dot1Q 101
 pppoe-client dial-pool-number 1
 no shut
 exit

interface Dialer1
 description VDSL
 ip address negotiated
 ip mtu 1492
 ip virtual-reassembly in
 encapsulation ppp
 dialer pool 1
 dialer-group 1
 ppp authentication pap chap ms-chap callin
 ppp chap hostname PPPoE-Username-From-ISP
 ppp chap password 0 PPPoE-Password-From-ISP
 ppp ipcp address accept
 no cdp enable
 no shut
Setting up NAT
So our client(s) connected to the router can get to the Internet we will need to configure NAT. In this example, I will be configuring overload or PAT. This is where the client(s) will share the public IP address issued to the router and don’t need their own static IP address.
ip nat inside source list 1 interface Dialer1 overload
access-list 1 permit 192.168.222.0 0.0.0.255

interface Dialer1
 ip nat outside

int vlan 1
 ip nat inside
Routes
First, we will set up our default route to send any traffic we don’t have a specific route for to the Dialer (VDSL) interface
ip route 0.0.0.0 0.0.0.0 Dialer1
Potentially you may want to add other routers. For example, if you have a switch behind the router with VLANs. You would want to add routes for those VLANs so you can get to the router’s management IP address from the internal network.
For example, if your internal VLANs are all on the 172 private range you could add.
ip route 172.16.0.0 255.240.0.0 Vlan1
More on the subject of Cisco
You may also like these posts
- Cisco IOS – Finding unused interfaces
- Cisco Debugging Via SSH
- On a Ciscio IOS device when you view the logs or the debug logs the date and time is not displayed
- How to break into a Cisco device
- Deleting all the contents of a folder on a Cisco IOS device
- Clearing a Dynamic ARP Entry from a Cisco ARP Table