
In this post I will cover how to configure WordPress to benefit from the Azure CDN to improve the speed.
My WordPress sites are hosed as Azure App Service sites, however that is not a requirement to use the Azure CDN. Your sites can be hosted with another provider.
There are a few basic steps
- Register Azure.CDN as a Resource Provider
- Creating an Azure CDN Profile
- Configuring a Custom Endpoint URL (Optional)
- Setting up WordPress to Use an Azure CDN
- You May Also Be Interested In
Register Azure.CDN as a Resource Provider
If you haven’t already you will need to register Azure.CDN as an Azure Resource Provider before you will be able to create profiles and use the CDN.
The check and enable Azure.CDN take a look at my other post Ensure Microsoft.CDN is listed as a registered Resource Provider [FIXED]
Creating an Azure CDN Profile
- Login to your Azure Admin Portal https://portal.azure.com
- Search for and open the “Front Door and CDN profiles” blade
- Click Create
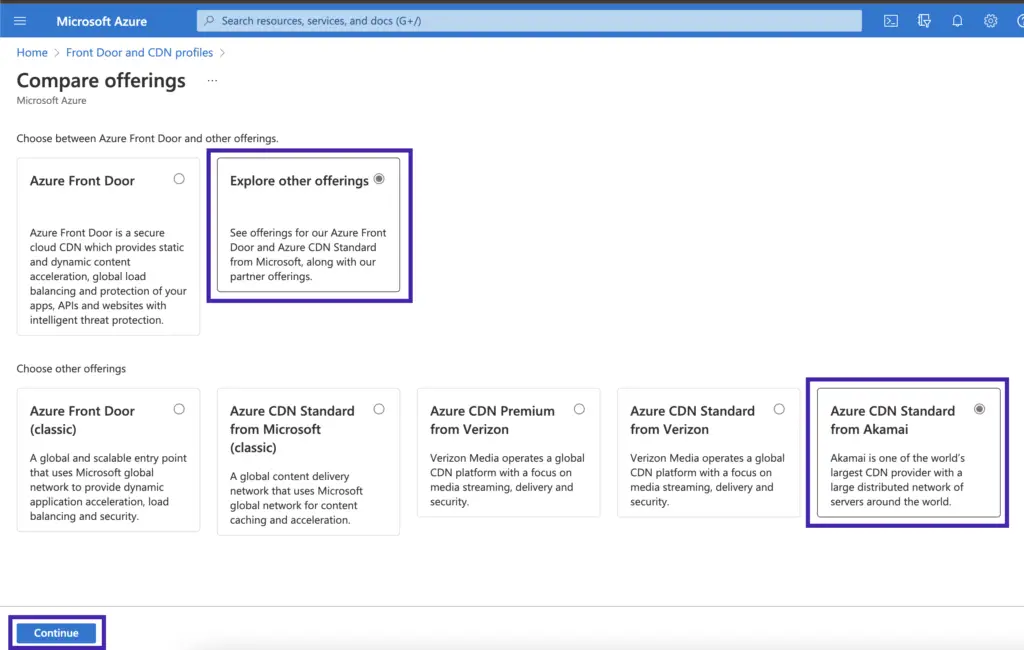
- Click the “Explore other offerings” radio
- Choose you’re offering. In this example I will use “Azure CDN Standard from Akamai”. Refer to this guide to find the best type for your needs https://docs.microsoft.com/en-us/azure/cdn/cdn-features
- Click Continue
- Complete all the required fields.
- At the bottom tick “Create a new CDN endpoint”
- In this example the WordPress site I want to use the Azure CDN with is hosted as an Azure App Services site, so I can set the. “Origin type” to “Web App” and select my App Services site. If you WordPress site is with another hosting provider set the Origin type to custom and enter the hostname for the website i.e. geekshangout.com
- Click Review + Create
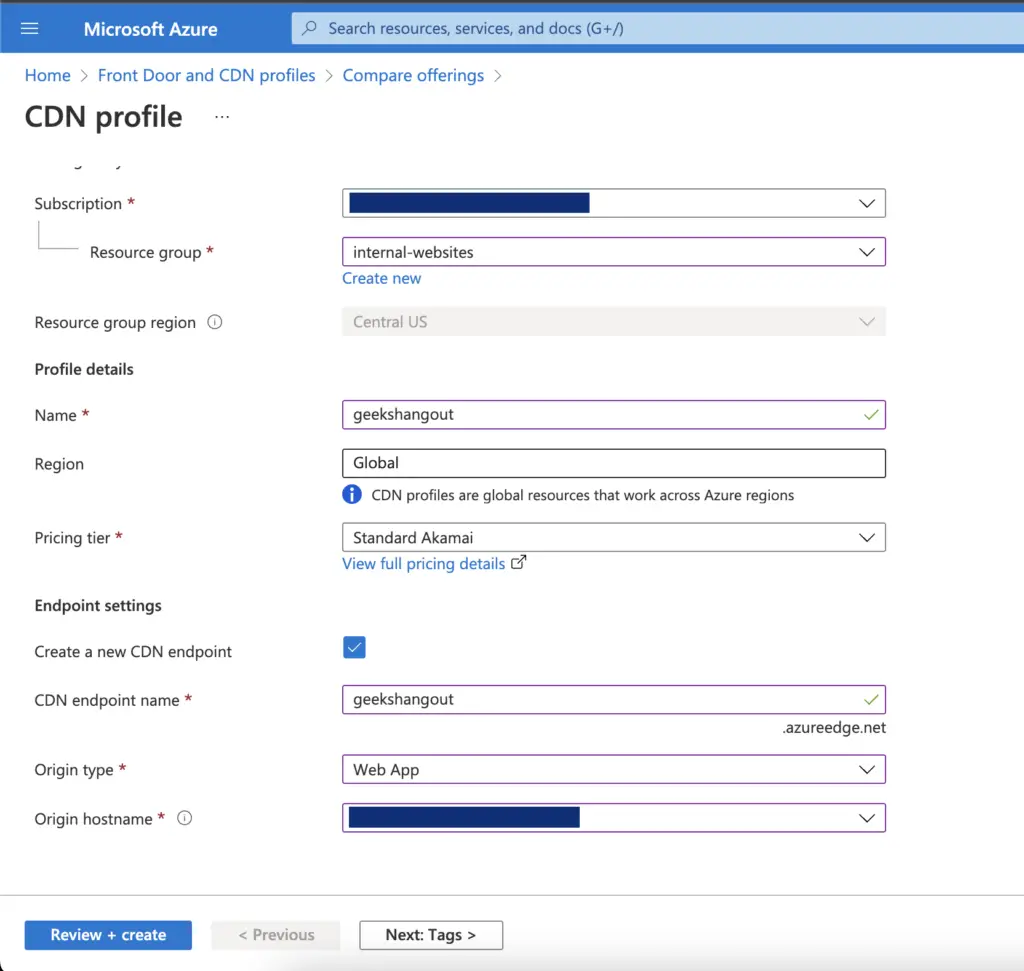
- Click Create and wait for the resource to create.
Configuring a Custom Endpoint URL (Optional)
When using the steps above, ticking the “Create a new CDN endpoint” option will have created an endpoint URL, such as https://geekshangout.azureedge.net based on the “CDN endpoint name” you entered.
But what I like to do is to set a custom URL for example https://cdn.geekshangout.com.
In this optional section I will cover how to add a customer domain, the required DNS setting and how to register a HTTPS certificate.
DNS Changes
If you are not using Azure DNS as the name servers for your domain, you will need to add two records to your domain.
- First
- Name: cdn
- Type: CNAME
- Alias: <your end CDN endpoint> i.e. geekshangout.azureedge.net
- Second – Used to verifying the domain for the HTTPS certificate
- Name: cdnverify.cdn
- Type: CNAME
- Alias: cdnverify.<your end CDN endpoint> i.e. cdnverify.geekshangout.azureedge.net
If you are using Azure DNS as the name server, you can get away with adding a single record and Azure will complete the DNS setup.
- Name: cdn
- Type: CNAME
- Alias Record Set: Yes
- Azure Resource: Select your CDN profile
Adding a Custom Domain
- Open your newly created CDN Profile
- On the Overview page click the Endpoint i.e. geekshangout.azureedge.net
- Click the “+ Custom Domain” button at the top to add a new custom domain
- Enter the required custom domain i.e. cdn.geekshangout.com and click Add
Note: If you see a message such as the below, make sure your DNS settings are correct, see the previous section
We couldn’t find a DNS record for ‘cdn.geekshangout.com’ that points to ‘geekshangout.azureedge.net’. Before you can associate a domain with this CDN endpoint, you need to create a CNAME record with your DNS provider for ‘cdn.geekshangout.com’ that points to ‘geekshangout.azureedge.net’..
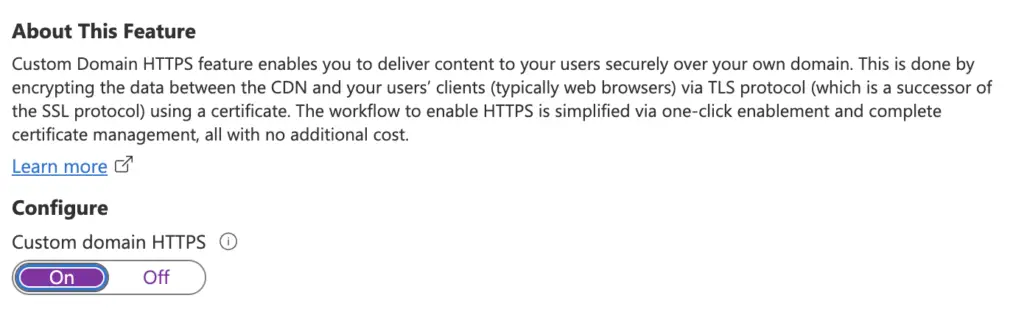
Adding a HTTPS Certificate to the Custom Domain
So you don’t get HTTPS security errors from using resources from a non-HTTPS cdn custom domain you will need to to enable HTTPS on the custom domain.
- Click your newly added custom domain
- Set the “Custom domain HTTPS” option to On
- Wait, it can take hours to complete! You will be able to track the status on the same page
Setting up WordPress to Use an Azure CDN
If you have added a custom domain with a HTTPS certificate as described in the previous section. It is important to wait for the certificate issuing to complete before continuing else you will get HTTPS errors.
Getting WordPress to use the CDN is achieved via a plugin. Several are available “WP Super Cache” and “WP Rocket” will provide CDN support as well as adding caching. “CDN Enabler” by KeyCDN is a good choice if you only want a CDN and you don’t need the caching features provided by other plugins.
Which plugin you use is up to you, personally I tend to use “WP Super Cache”. Once installed here is an overview of where to enter your endpoint URL
WP Super Cache
- Navigate to the WordPress Admin Dashboard
- Navigate to Settings => WP Super Cache
- Select the “CDN” tab
- Tick “Enable CDN Support”
- Set the “Off-site URL” to be your endpoint URL i.e. https://cdn.geekshangout.com
WP Rocket
- Navigate to the WordPress Admin Dashboard
- Navigate to Settings => WP Rocket
- Select the “CDN” tab
- Tick “Enable Content Delivery Network”
- Insert the endpoint that’s been configured in Azure CDN I.e https://cdn.geekshangout.com
CDN Enabler
- Navigate to the WordPress Admin Dashboard
- Navigate to Settings => CDN Enabler
- Set the “CDN Hostname” to be your endpoint url i.e. https://cdn.geekshangout.com
- You shouldn’t need to change anything else for CDN support
You May Also Be Interested In
- Azure App Services and WordPress with PHP 8.1 / 8.2
- WordPress Emails on Azure Configuring SendGrid
- Ensure Microsoft.CDN is listed as a registered Resource Provider [FIXED]
- WordPress & Azure Front Door Too Many Redirects
- WordPress: The Wordfence Web Application Firewall cannon run – Azure App Services